[ The reading room ]

Latest stories

Words from the Quill community. 8 stories to read.

01Jiya Agrawal / May 30, 2026 / 4 min read

You’re Using TypeScript Wrong Without These Utilities

TypeScript? Yeah, we all use it daily. Defining props for a component, typing an API response, making sure no one passes string where a number belongs — all good. But here’s the thing: * What if you only want to use part of a type? → You’d probably create a new one, right? * What if you want to use the whole type except one field? → Yep, another new one. * What if you want the type but with everything optional? → You guessed it… another type. Feels like we’re constantly cloning types just to tweak them a little. What if you didn’t have to create new ones every time? Sounds nice, right? That’s where TypeScript Utility Types come in. They’re like shortcuts that let you reuse and transform existing types instead of reinventing them. Let’s look at the ones I (and probably you) will actually use every day: * Partial * Pick * Omit * Readonly * Record 1. PARTIAL<T> – WHEN YOU DON’T NEED EVERYTHING Normally, a type forces you to provide all its properties. But in real projects, that’s not always how data flows. For example, when you’re updating a user profile, you might only have one or two fields to update - not the whole object. That’s where Partial comes in. It makes every property optional, so you can pass only what you need. type User = { id: number; name: string; email: string; isAdmin: boolean; }; const updateUser = (id: number, data: Partial) => { // data could be { name: "Alice" } // or { email: "alice@example.com" } console.log(`Updating user ${id} with data:`, data); }; You can use Partial mostly for: * PATCH API requests (where you only send the changed fields) * Form updates (user changes only name, not email) * Optional configs (default values filled in later) 2. PICK<T, K> – ONLY GRAB WHAT YOU NEED Sometimes you don’t want the entire object - just a subset. That’s what Pick does: it extracts only the keys you care about and ignores the rest. This is super handy for things like UI components. For example, a user card component doesn’t need admin rights, just basic info. type User = { id: number; name: string; email: string; isAdmin: boolean; }; type UserCardProps = Pick<User, "name" | "email">; const UserCard = ({ name, email }: UserCardProps) => ( <div> <h2>{name}</h2> <p>{email}</p> </div> ); You can use Pick when: * Passing props to components (only what’s needed) * Creating lightweight response objects from APIs * Avoiding duplication of types while working with forms or DTOs 3. OMIT<T, K> – HIDE WHAT YOU DON’T WANT Sometimes the opposite problem happens: you want everything except a few fields. That’s where Omit comes in. It’s perfect for situations where you don’t want to expose sensitive data (like password or isAdmin) in an API response, but still want the rest of the object. type User = { id: number; name: string; email: string; password: string; isAdmin: boolean; }; type PublicUser = Omit<User, "password" | "isAdmin">; const getPublicUser = (user: User): PublicUser => { const { password, isAdmin, ...rest } = user; return rest; }; I use Omit mostly for: * Sanitizing API responses (never send passwords/tokens back) * Building public-facing models from internal data * Avoiding duplication while still maintaining type safety 4. READONLY<T> – LOCK IT DOWN There are some objects in your app you never want to change after creation - configs, constants, environment settings, etc. Readonly makes every property immutable, so you can’t accidentally overwrite it. type Config = { appName: string; version: string; }; const config: Readonly<Config> = { appName: "MyApp", version: "1.0.0", }; config.version = "2.0.0"; // ❌ Error I use Readonly for: * Configuration objects (like app settings, API base URLs) * Constants that should never be reassigned * Preventing bugs where devs accidentally overwrite data 5. RECORD<K, T> – BUILD CLEAN MAPPINGS Record is like a type-safe dictionary. It lets you define a set of keys and the type of their values. This makes it great for creating lookup tables, enums with data, or permission maps. type Role = "admin" | "user" | "guest"; const rolePermissions: Record<Role, string[]> = { admin: ["read", "write", "delete"], user: ["read", "write"], guest: ["read"], }; 💡 I use Record when: * Defining permissions or role-based access * Building feature flag systems * Creating lookup tables (like country codes → country names) TL;DR Instead of constantly creating new types, just to tweak an existing one. TypeScript gives you shortcuts for this: * Partial → updates & optional configs * Pick → select exactly what you need * Omit → exclude sensitive/unwanted fields * Readonly → lock down constants * Record → clean mappings, type-safe dictionaries Once you start using them, you’ll wonder why you ever copied and pasted whole types before. If you enjoyed this article and want to discover more such lesser-known but powerful JavaScript, TypeScript, ReactJS, NextJS features, follow me for more insights. LinkedIn Twitter

02Jiya Agrawal / May 30, 2026 / 3 min read

Promise Hacks Out, queueMicrotask() In

STOP TURNING FUNCTIONS INTO PROMISES JUST FOR ASYNC EXECUTION - MEET QUEUEMICROTASK() If you’ve ever wrapped a function in Promise.resolve().then(...) just to make it run asynchronously, you’re not alone. It’s a common trick and it work, but it’s not the most intentional way to do it. JavaScript actually gives us a dedicated API for this exact purpose: queueMicrotask(). THE BACKSTORY: MICROTASKS VS MACROTASKS To understand why queueMicrotask() exists, we need to zoom in on the JavaScript event loop. JavaScript execution is single-threaded, but it’s designed to handle asynchronous events. The event loop processes tasks in two main queues: 1. Macrotask queue → Timers (setTimeout, setInterval), UI rendering, network callbacks, etc. These are scheduled after the current stack finishes and after all microtasks are cleared. 2. Microtask queue → Promise .then() callbacks, MutationObserver callbacks, and… queueMicrotask(). These run immediately after the current stack finishes but before any macrotasks. That difference is huge: [https://cdn.hashnode.com/res/hashnode/image/upload/v1755191970329/687e53ac-3625-47c0-a629-8edacb241c3b.png] Output : > A > > D > > B - microtask > > C - macrotask Microtasks always jump the line in front of macrotasks. THE OLD HACK: PROMISES FOR MICROTASKS Before queueMicrotask() existed, the easiest way to get into the microtask queue was: [https://cdn.hashnode.com/res/hashnode/image/upload/v1755192174567/4ce8aa90-6f6f-4cdd-882e-b192b418afbc.png] It works, but it comes with: * Unnecessary Promise creation overhead. * Slightly less clear intent, looks like you’re working with promises, but you’re not. * A bit of mental friction for newcomers who expect .then() to mean “waiting for some async operation”. THE MODERN WAY: QUEUEMICROTASK() queueMicrotask() was introduced to solve exactly this problem: Schedule a function to run as a microtask, without pretending it’s about Promises. [https://cdn.hashnode.com/res/hashnode/image/upload/v1755192626278/eeb15b2d-75a5-4307-9b17-b38e89209b56.png] THINGS TO KEEP IN MIND REGARDING QUEUEMICROTASK() * Always runs in the microtask queue (just like .then() callbacks). * No promise object is created - it’s lightweight. * Executes after the current synchronous code finishes, but before any macrotask. WHEN TO USE QUEUEMICROTASK() * Deferring work until after the current synchronous operation finishes, without waiting for the next macrotask. * Avoiding promise creation overhead when all you want is microtask scheduling. * Library development where precise async ordering matters. * Preventing race conditions - for example, ensuring callbacks run after all sync setup is complete. PROS * Lighter and more explicit than wrapping in Promise.resolve().then(...). * Clear signal to readers: "I want this to run in the microtask phase." * Slight performance edge in tight loops or high-frequency async scheduling. CONS (SHARED WITH PROMISES) * Can starve the event loop if abused (e.g., recursively queuing microtasks). * No way to cancel once scheduled. * Runs so soon that it can block rendering if the work is heavy. TL;DR * queueMicrotask() is like .then() callbacks, but faster and more explicit. * Use it when you want microtask timing without faking it with Promises. * Don’t abuse it in long-running loops, or you might block UI updates. If you’ve been using Promises just to get microtask behavior - it’s time to stop. queueMicrotask() was literally made for that. If you enjoyed this article and want to discover more such lesser-known but powerful JavaScript, ReactJS, NextJS features, follow me for more insights. LinkedIn Twitter

03Jiya Agrawal / May 30, 2026 / 5 min read

My handbook on CSS Selectors

WHAT DOES IT ACTUALLY MEAN? > What comes in your mind when you think of selectors? Basically they are used for targeting a particular area, right? And then of course CSS is used for styling our website. So when we talk about CSS selectors, what they do is simply target a particular area or say an element so that we can put some style in it without making other elements change. With the help of CSS selectors, we don't have to keep repeating ourselves by writing the same style-code for same elements but in different areas, we just have to do it once and tadaa, you have that style everywhere; now isn't it amazing? Now, let's talk about its different types. Obviously there can't be just one type of it, it's coding, there is always several types of everything! So, let me introduce you with some of them which are used most often... TYPES OF CSS SELECTORS We will use this html file for all the examples in this article.. <!DOCTYPE html> <html lang="en"> <head> <meta charset="UTF-8"> <meta http-equiv="X-UA-Compatible" content="IE=edge"> <meta name="viewport" content="width=device-width, initial-scale=1.0"> <title>CSS Selectors</title> <link href="style.css" rel="stylesheet"> </head> <body> <nav class="navigation"> <div class="nav-head"> <h2> CSS Selectors </h2> </div> </nav> <header class="head"> <h4>React</h4> <p>Json</p> <p>Node<p> </header> <section class="type"> <div class="container "> <h1 class="different-color">Types</h1> </div> </section> <section class="type"> <div class="container"> <h1>Hii <p>Hello</p> </h1> <h3>JavaScript <div> <p> Homegnome</p> </div> <p>Homealone</p> </h3> </div> </section> <footer id= "foot"> <div class="footer-head">Contact me!</div> </footer> </body> </html> 1. UNIVERSAL SELECTOR Syntax *{ property : value; } Universal Selectors are set usually at the top of a CSS file. Every property inside this block will be applicable on the whole HTML. They really just go and selects all the elements of HTML. But they also have the lowest level of specificity so anything can override this setting and thus it is not really really efficient. Example *{ color: red; } 2. ELEMENT SELECTOR Syntax element_name{ property : value; } Element selector directly target the asked element from the HTML. No matter how many times that element was in the HTML, it will have the style according to the properties defined in this selector. Example p{ padding : 1rem; margin : 1rem; } 3. CLASS SELECTORS Syntax .class_name{ property : value; } Class selector is one of the most important and most commonly used selector. They are easily to use and very helpful while styling the website. It is a way to select a group of elements and make sure they all have same styles. We can have multiple classes defined for multiple elements. Example .container{ color : blue; } 4. ID SELECTORS Syntax .id_name{ property : value; } ID selector is almost same like the class selector except in a whole HTML file, an id can be defined only one time for only one element. Example #foot{ background-color : gray; } 5. CLASS INSIDE ELEMENT Syntax element.class_name{ property : value; } This selector says that every element with this class in it will have the mentioned properties. This helps us go a little more selective while styling a webpage. Example h1.different-color{ color : yellow; } 6. MULTIPLE ELEMENT SELECTOR Syntax element1, element2{ property : value; } Multiple element selector give us the facility of not repeating ourselves where we can set a similar property with same value for two different elements. Example p, h1{ color : black; } 7. ELEMENT INSIDE ELEMENT Syntax element1 element2{ property : value; } This selector says that all the element2 which are inside the element1 will have these particular properties. Example h1 p{ font-size : large; } 8. CHILD-PARENT SELECTOR Syntax element1 > element2{ property : value; } This selector says that every child element as element2 with a parent element as element1 will have these mentioned properties. Example h3 > p{ text-align : centre; } 9. NEIGHBOR SELECTOR Syntax element1 + element2{ property : value; } This selector says that an element as element2 which just after element1 or is the immediate neighbor of element1 will bear same properties. Example h4 + p{ border : 1px solid black; } 10. !IMPORTANT Syntax element1{ property : value !important; } This is a dangerous selector, it makes it concrete that this particular property will be implemented on this element for sure even if it is overridden a thousand times. It will become static for the whole file. We are usually not supposed to use !important as it may become difficult for a new web developer to figure out the problem if he/she tries to change something but that property has !important put by the old webdev. Example p{ border-radius : 5px !important; } //again p is redefined after sometime p{ border-radius : 10px; } //Border radius will stay 5px because it has an !important in it even if it is redefined later. For More > There are many types of CSS Selectors, if you want to learn more about it, you can do it here CSS Selectors Important Note > CSS works in top to down structure so you have to keep in mind what properties are you over-ridding. Usually an inline-style is what affects the CSS directly and overwrites it, but they happen on the individual elements only. I hope you find this article useful! We can connect through * Github * LinkedIn * Twitter

04Jiya Agrawal / May 30, 2026 / 5 min read

Confusing concepts of JavaScript

There are a lot of things in JavaScript that are a small part of it but makes a big difference. Let's discuss two such things here today. > 1. Difference between null, NaN, undefined and undeclared. > > 2. Difference between "==" and "===". 1. NULL, NAN, UNDECLARED, UNDEFINED. NULL Null comes up as an output when we explicitly assign the value of some variable as "null". When we intentionally want some variable to have no value, we assign it as "null". Null's data type is object. It means that an object is basically empty and doesn't point to any memory address. But then again in arithmetic operations, null behaves as 0. Also, when in a function, null will not take default parameter/available parameter, it will stay null. EXAMPLE const a = 1 + null; console.log(a); const obj = {a: null}; const stringObj = JSON.stringify(obj); console.log(stringObj); // {a:null} // We have explicitly assigned the value of a as null; function consoleLog(b = "hello") { console.log("Your output is : ",b) } const k = null; consoleLog(k); // Your output is : null // Even though there is an available value for k which can be "hello", it will still print null. NAN NaN(Not a Number) is nothing but an indication that whatever the outcome you got is not a legitimate number. But a weird thing about NaN is that it's datatype is "number". A good example of this is 0/0. 0/0 is technically undefined in layman terms but in logical terms, whatever the output will be, it surely is not a number even though we are operating it on valid numbers. EXAMPLE console.log(0/0); // NaN console.log(1+undefined); //NaN UNDECLARED Undeclared is simple error which comes when we use a variable before its declaration. For declaration of a variable in JavaScript, we use var, let or const. It is basically using an item without its existence. Undeclared values give ReferenceError : variable_name is not defined. EXAMPLE const a=10; let c=a+b; console.log(c); // ReferenceError : b is not defined. UNDEFINED Undefined is a datatype in JavaScript. When you have declared some variable and haven't given any value to it but you are still using it, then we get this statement. This says that the variable exists but its value does not exist in the compiler. On the very basic level, we can say that every variable's default value is "undefined" until we give some legit value to it. Also, if you JSON.stringify an object with a key whose value is undefined, you'll get an empty object., because JSON doesn't have "undefined" value. One difference between null and undefined is that undefined will take available value/ default parameter in a function. EXAMPLE const obj = {a: undefined}; const stringObj = JSON.stringify(obj); console.log(stringObj); // {} function consoleLog(b = "hello") { console.log("Your output is : ",b) } const k = undefined; // Here k basically said that I exist but // I do not have any value assigned to me as of right now. consoleLog(k); // Your output is : hello // Since there is an available value for k, // the undefined variable took its value. Now there's this weird similarity and dissimilarity between undefined and null console.log(null == undefined); // true // Since both null and undefined says that there is // no value for the variable you're trying to access, // this is true in double equals to comparison console.log(null === undefined); // false // Why is this false?????? // Let's look into our next topic... 2. VS = When we see these two operators, the first thing that comes in our mind is comparison, but why are there two operators for the same purpose? So, there are two types of equality : 1. Abstract (==), 2. Strict (===) Let's see with an example console.log(1 == "1"); // true console.log(1 === "1"); // false How is this possible? What is happening above? == So, basically when we do "==" comparison, something called type coercion happens in the background which is our implicit type conversion to a common data type between the operands. Here, when we are doing 1 == "1", our JavaScript will first convert the data types of our operands into something common and then will just compare their values. So, even though one is string and the other is a number type, their values are same. === Now, when we are doing "===" comparison, firstly the data types of our operands will be compared and then if the data types are same, then only the values will be compared. There is no type conversion in "===". That's why when we put 1 === "1", one is a string type and the other is number type, we got false as our answer. Let's see another example for this. console.log(0 == false); //true console.log(0 === false); //false Here we know that 0 is used to represent false boolean even though it is a number. "==" does the type coercion and then compared the value and gave answer as true whereas "===" did data type comparison and got different results. > So, to get the null === undefined : false, we know what is happening behind this, null's data type is an object which is not equals to undefined data type, simple! So, these were tiny but confusing parts of JavaScript. I hope some of the fog got cleared through this article, do let me know if it was helpful for you, keep coding! Let's connect at * Github * LinkedIn * Twitter

05Jiya Agrawal / May 30, 2026 / 5 min read

HTML with meaning!

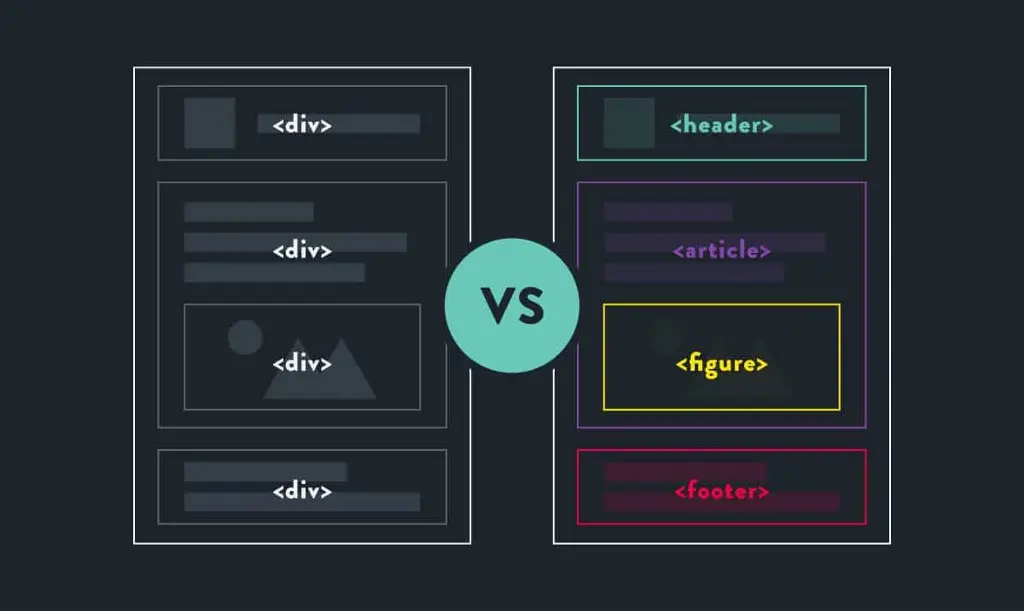
Every student have written HTML at least once in their lifetime. In 5th standard, the best magic we saw on computer was "marquee" tag. Also we learnt that there is something like "h1, h2" and so on. What does these means? One other thing we learnt back then was a "div" tag, and we understood that this makes a box where we can write stuff and such without telling us what that box can do. HTML is supposed to give the skeleton of the web page but back then it wasn't able to specify different organs of it. We made a page with 5 "divs" in it which do not make it clear for a code reader what is actually happening in the code. Is it a navigation bar? Is it a footer? Is it main body for the page? Well, you guess. So, what can we do to give a proper readable structure to our code? We can just make HTML tags which has some meaning, no? WHAT IS SEMANTIC HTML? HTML5 introduced Semantic HTML. By the name itself, it gave us meaningful tags which will be used for particular type of item only. Basically things got easier for both the developer and the browser. Let's see some of the semantic tags first then we will discuss what are some advantages of HTML5. Header : This is a container which will have the brand name and will be at the top of the web page. Nav : This will contain all the navigation links for the web page. Main : This container has the unique data for each web page which is not repeated in any other page. There should only be 1 main tag in your html page. Section : This will give you a section in your web page. There can be so many sections describing different parts of your web page but all of them are related to each other. Like you can put introduction, contact info, details in different sections but all of them are ultimately dependent upon each other. Aside : This container is usually used for a sidebar for the main content. Article : In article tag, you usually put the content which is not dependent upon the other content of the page, it doesn't need a context. For example like we see a newspaper, all the articles in the newspaper are independent. Footer : Now this is the last container in a web page where we give links for further contact and credits and such. <html> <head> </head> <body> <header> This is the Header of the page. </header> <nav> This container has navigation links. </nav> <article> This is an independent article. <article> <main> This container has main content. <aside> This is a sidebar. </aside> <section>This is section one </section> <section>This is section two </section> <section>This is section three </section> </main> <footer> This is the footer of the page </footer> </body> </html> See even a layman can read this code easily. Now let's look at some lesser known semantic tags of HTML. Details : This is an open-close tag, where you click on a heading and you will get more details about it. By default it is close. > Note : Generally we use details tag along with summary tag for heading. Summary : Summary tag is used for the heading of details tag. This heading works like a toggle for open and close of the details. > Note : It's the first child of details tag. Figure : This tag is used to put an image, illustration or a diagram on your web page which will be independent of the other content. Figcaption : This tag is used so that we can give a caption to some image. Basically what is that image there for, its name or details about it. Mark : This tag is used as a highlighter in a paragraph or things. It will highlight a particular part of text in yellow color. <html> <head> </head> <body> <header> This is the Header of the page. </header> <nav> This container has navigation links. </nav> <article> This is an independent article. <article> <main> This container has main content. <aside> This is a sidebar. </aside> <section> <details> <summary>Semantic HTML </summary> <p><mark>Semantic HTML</mark> gives meaning to the webpage rather than just presentation. </p> </details> </section> <section> <figure> <img src="" alt=""> <figcaption>This is the name of the image.</figcaption> </figure> </section> </main> <footer> This is the footer of the page </footer> </body> </html> ADVANTAGES UNDERSTANDABILITY Semantic HTML makes a new developer understand an old code really easily because each tag is used for a particular part of the page which has some meaning. SEARCHING If a developer wants to update a part of the code, he/she can easily search for the relevant tag rather than going through a list of divs or spans. SEO Search engine optimization is better as web crawlers now can parse through certain keywords and understand the website content easily. ACCESSIBILITY Screen readers who helps the visually impaired users can use these tags to navigate to different part of the page in a more efficient way. CONCLUSION Basically, semantic HTML means that your site architecture separates its presentation from its content. For a long time, developers struggled with HTML because it has no structure but with HTML5, we got better at it. So every developer now should make use of these meaningful tags. Hope you learnt something from this article. Do let me know in the comments and keep coding! Let's connect at * Github * LinkedIn * Twitter

07Om Kakatkar / Jun 2, 2026 / 5 min read

Array Methods for Functional Programming

Functional programming is a paradigm which avoids changing state and mutable data. Functional way of writing a program is using pure functions and immutable data structures. JavaScript comes with many in-bulit functions to support this functional approach. In this article, we would be learning about a few such methods to manipulate arrays in a functional way. These methods are higher order functions i.e. they require a callback as an argument. Have a look at my previous blog to get a quick review about arrow functions. MAP The map() method iterates over each array element and executes the callback function for them. It returns a new array without altering the original one. Callback can take 3 parameters. * Current Value (required) * Index * Array Callback returns the manipulated element. map() can optionally take a second parameter (thisArg) which specifies the value of 'this' to be used. Syntax array.map(function(currentValue, index, array) { return statement }, thisArg) Example const numbers = [1, 44, 66, 11, 43] const tripledNumbers = numbers.map(num => num * 3) console.log(tripledNumbers) // [3, 132, 198, 33, 129] FILTER The filter() method iterates over each array element, applies the callback and returns an array consisting of element matching the criteria. Callback can take 3 parameters. * Current Value (required) * Index * Array Callback returns a boolean value which is used to construct the new array. filter() can optionally take a second parameter (thisArg) which specifies the value of 'this' to be used. Syntax array.filter(function(currentValue, index, array) { return statement }, thisArg) Example const numbers = [1, 44, 66, 11, 43] const oddNumbers = numbers.filter(num => num % 2) console.log(oddNumbers) // [1, 11, 43] REDUCE The reduce method applies the supplied reducer function and return a single value. In other words, it reduces the array into a single value without mutating the original array. Callback or the reducer function can take 4 parameters. * Previous Value (required) * Current Value (required) * Current Index * Array Callback returns a value which is used as the previous value in the next iteration. reduce() can optionally take a second parameter (initialValue) to be used as previousValue in the first iteration while currentValue is set to the first element. If nothing is provided, previousValue is initialized to the first element and currentValue is initialized to the second element. Syntax array.reduce(function(previousValue, currentValue, currentIndex, array) { return statement }, initialValue) Example const numbers = [1, 44, 66, 11, 43] const sum = numbers.reduce((acc, curr) => acc + curr, 0) console.log(sum) // 165 FIND The find() method check the array elements for set condition and returns the first occurrence. It is similar to filter but unlike filter which returns all matched elements in an array, find will return the first matched element. Callback can take 3 parameters. * Current Value (required) * Index * Array Callback returns a truthy value if element is found and in such cases the value is immediately returned terminating further iterations. find() can optionally take a second parameter (thisArg) which specifies the value of 'this' to be used. Syntax array.find(function(currentValue, index, arr),thisValue) Example const numbers = [1, 44, 66, 11, 43] const multipleOf4 = numbers.find(num => num % 4 === 0 ) console.log(multipleOf4) // 44 EVERY The every() method tests whether all elements in the array pass the test provided as a callback and returns a Boolean value. Callback can take 3 parameters. * Current Value (required) * Index * Array Callback returns a Truthy or Falsy value according to the test function results. Incase of a falsy value, a boolean value of false is immediately returned terminating further iterations. every() can optionally take a second parameter (thisArg) which specifies the value of 'this' to be used. Syntax array.every(function(currentValue, index, arr),thisValue) Example const numbers = [1, 44, 66, 11, 43] const isNaturalNumber = numbers.every(num => num !== 0 ) console.log(isNaturalNumber) // true SOME The some() method tests whether atleast one element in the array pass the test provided as a callback and returns a Boolean value. Callback can take 3 parameters. * Current Value (required) * Index * Array Callback returns a Truthy or Falsy value according to the test function results. Incase of a truthy value, a boolean value of true is immediately returned terminating further iterations. some() can optionally take a second parameter (thisArg) which specifies the value of 'this' to be used. Syntax array.some(function(currentValue, index, arr),thisValue) Example const numbers = [1, 44, 66, 11, 43] const containsEvenNumber = numbers.some(num => num % 2 == 0 ) console.log(containsEvenNumber) // true BONUS: CONVERTING SORT TO FUNCTIONAL APPROACH The sort() method sorts the array in place which means it mutates the original array. But, instead of directly providing the original array to the sort function, we can provide a copy of the array using the (...) spread operator. This will ensure that the original array stays unchanged Example const numbers = [1, 44, 66, 11, 43] const sortedNumbers = [...numbers].sort((a, b) => a - b) console.log(`Original Array : ${numbers}`) console.log(`New Array : ${sortedNumbers}`) // Original Array : [1, 44, 66, 11, 43] // New Array : [1, 11, 43, 44, 66] POINTS TO NOTE * Reduce is a general purpose method and can be used to implement any of the above mentioned methods. Example const numbers = [1, 44, 66, 11, 43] const tripledNumbers= numbers.reduce((acc, curr) => [...acc, curr * 3], []) console.log(tripledNumbers) // [3, 132, 198, 33, 129] * Map and Filter (also reduce if it returns an array) can be chained together will other methods. Example const numbers = [1, 44, 66, 11, 43] const tripledOddNumbers = numbers.map(num => num * 3) .filter(num => num % 2) console.log(tripledOddNumbers) // [3, 33, 129] SUMMARY * In this blog we learned about various array methods (viz. map, filter, reduce, find, ,every, some ) which follow the functional programming approach. * We also saw a way to use the non-functional sort method in a functional way. * Reduce can be used to mimic the behaviour of other array methods * Map and Filter can be chained with other methods